1. Open the Start Menu and type
regedit.exe in the search line, then press enter.
2. If prompted by
UAC, then click on
Yes.
3. In regedit, go to the location below: (see screenshot below step 4)
Code:
HKEY_CLASSES_ROOT\CLSID\{323CA680-C24D-4099-B94D-446DD2D7249E}\DefaultIcon
4. In the left pane of regedit, right click on the
DefaultIcon key and click on
Permissions. (see screenshot below)
5. At the top, select the
Administrators group. At the bottom, check the
Allow box to the right of
Full Control and click on
OK. (see screenshot below)
6. In the right pane of regedit, right click on
(Default) and click on
Modify. (See screenshot below)
7. To Restore the Default Favorites Icon - A) In the
Modify window from regedit, type in the path below and click on
OK.
Code:
%SystemRoot%\system32\imageres.dll,-1024
B) Go to step 10.
A) In the
Modify window from regedit, type in the full path in quotes of where you have your custom icon (.ico file) stored at, then click on
OK. (see screenshot below)
WARNING: You will need to use a 256x256 pixel icon that was made for Windows 7 and Vista for them to display properly at all of the available icon view sizes in Windows 7. You will also need to leave the icon (.ico file) saved at the exact location you typed below for it to continue to work. If you delete or move this icon, then it will no longer be displayed.
B) Go to step 10.
A) Download and install the free program
IconViewer to add the
Icons tab in the screenshot below step 8B.
NOTE: Be sure to download the correct 32-bit or 64-bit version for your Windows 7.
B) In Windows Explorer navigate to the
.exe (ex: for program icons) or
.dll (ex: Windows 7 icons) file that contains the icon that you want to use for the default Library icon, then right click on the file, click on
Properties, and the
Icons tab. (see screenshot below)
NOTE: The most common Windows 7 icons come from the C:\Windows\System32\imageres.dll file.C) Make note of the icon number for the icon that you want to use instead. (see screenshot above)
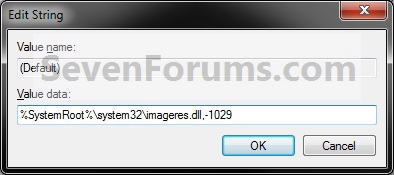
NOTE: For example, the default Favorites icon number is 1024. I'm going to change it to the 1029 icon number just as an example.
D) In the
Modify window from regedit, type in the full path of the .exe or .dll file followed by
,-icon# (fullpath,-####) and click on
OK. (see screenshot below)
NOTE: For example, if I want to use the path (step 9B) and the 1029 icon (step 9C), I would type:
%SystemRoot%\system32\imageres.dll,-1029
OR
C:\Windows\System32\imageres.dll,-1029
To also change the Favorites icon in the "Open" and "Save as" type windows as well in
64-bit Windows 7, you will also
need to do this step.
If you have a
32-bit Windows 7 installed, then
skip this step since doing steps 1 to 7/8/9 will change the Favorites icon in the "Open" and "Save as" type windows as well.

A) In regedit, go to the location below:
Code:
HKEY_Local_Machine\Software\Wow6432Node\Classes\CLSID\{323CA680-C24D-4099-B94D-446DD2D7249E}\DefaultIcon
B) Repeat steps 4 to 7/8 above.
11. Close regedit.
12. Restart the computer to fully apply.
That's it,


 Reply With Quote


Social Networking Bookmarks