


As promised this thread will document recovery procedures. I find these methods to be FAR more successful than when using other apps. I will document usage in Windows and Linux, I rather use Linux LiveCDs as they seem to read more reliably when the drive or partition is damaged. I will update the thread as and when I can.
Recover specific files, directories or all data from a partition using Gparted LiveCD **Recommended Option**
Spoiler:Tools Used:
Gparted LiveCD
USB stick or blank CD to load image onto
Unetbootin if writing ISO to USB stick (Windows, Linux, OSX)
Steps:
- If using a CD burn ISO to CD
- If using USB stick select Diskimage box, load ISO into Unetbootin, select your USB, click OK
- Boot to LiveCD/USB
- Do not alter keymap
- Type 02 for English
- Type 0 to launch Gparted
If saving to a network share:
Spoiler:
- Launch Network Config from desktop, select DHCP Broadcast and press Enter, when it succeeds press Enter to close
- Open terminal
- Use command: sudo mkdir /mnt/TargetShare
- Use command: sudo mount -o username=USER,password=PASS //ServerIP/Share /mnt/TargetShare Note: If share does not require a login then remove '-o username=USER,password=PASS'
- If you do not use login credentials and Terminal asks for a password just press enter
- Once share is mounted right click on the desktop, File Manager, navigate to /mnt/ and check TargetShare is there
If saving to a local drive (inc. USB):
Spoiler:
- Use command: sudo mkdir /mnt/TargetShare
- Insert the USB flash drive into an open USB port
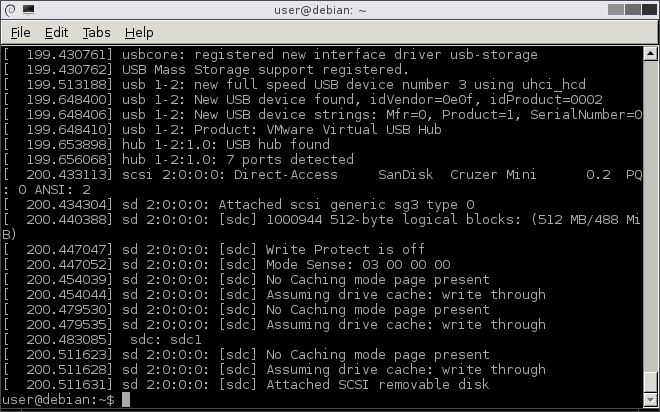
- Use command: dmesg
- Visually search through the last few lines of dmesg output to find the device name. The device name should be in the form "sdX" where "X" is a lower case letter.
- In the above example, the device name is "sdc".
- If the device name is "sdc", enter: sudo mount /dev/sdc1 /mnt/TargetShare
- Now proceed to the Testdisk section
- When you are finished copying files and have finished the Testdisk section, unmount the USB flash drive by entering: sudo umount /mnt/TargetShare
- Launch Testdisk
- No Log
- Select source drive (where the data is to be recovered from)
- Select partition type, If recovering from a Windows drive select Intel partition
- Select advanced
- Highlight the partition which contains the data
- Use right and left arrows to select List at the bottom and press enter
- If you want to recover all files on that partition press 'a' then 'C' (note capital c)
- If you want to recover a particular directory navigate to it and once at it's root press 'a' then 'C' (note capital c)
- If you only want to recover a particular file navigate to it so it is highlighted then press 'c'
- Now you need to select a target for the files, use the left arrow to get to root, highlight mnt and press right arrow, highlight TargetShare and press right arrow, then press 'C' (note capital c)
- The files will then transfer and the text will change to green once completed.
Recover specific files, directories or all data from a partition in Windows
Spoiler:Tools used:
Testdisk & Photorec (6.14 WIP, 6.13 Stable)
Steps:
- If recovering to an external drive (or internal) connect it before you start so that it is visible in My Computer, make a note of it's drive letter
- Launch Testdisk
- No Log
- Select source drive (where the data is to be recovered from)
- Select partition type, If recovering from a Windows drive select Intel partition
- Select advanced
- Highlight the partition which contains the data
- Use right and left arrows to select List at the bottom and press enter
- If you want to recover all files on that partition press 'a' then 'C' (note capital c)
- If you want to recover a particular directory navigate to it and once at it's root press 'a' then 'C' (note capital c)
- If you only want to recover a particular file navigate to it so it is highlighted then press 'c'
- Now you need to select a target for the files, you will start in the folder which contains the Testdisk exe, use the left arrow and you will end up at a page which lists all local drives, the drive letter will be at the end of each line.
- Find your desired drive letter, press the right arrow and get to the directory where you want the files to be saved, once at the root of the directory press 'C' (note capital c)
- The files will then transfer and the text will change to green once completed.

 Reply With Quote


Social Networking Bookmarks