


Many factors play a part in image sharpness, not the least of which is the lens. Most of us who ever pick up a camera judge our images, at least in part, on overall sharpness. Before you go out and plunk down some hard earned cash on that top of the line pro-level lens you�ve been drooling over, think about these steps you can take with the lenses you already own to get sharper images.
- Pay attention to the basics. Hold the camera properly. Your right hand should grip the camera with your finger ready to press the shutter button. Your left hand should cradle the lens. Tuck your elbows firmly against your side. Press the eye cup of the camera firmly against your head. This three-point stance stabilizes the camera and holds it steadier than holding the camera out and away from your face, with your arms extended.
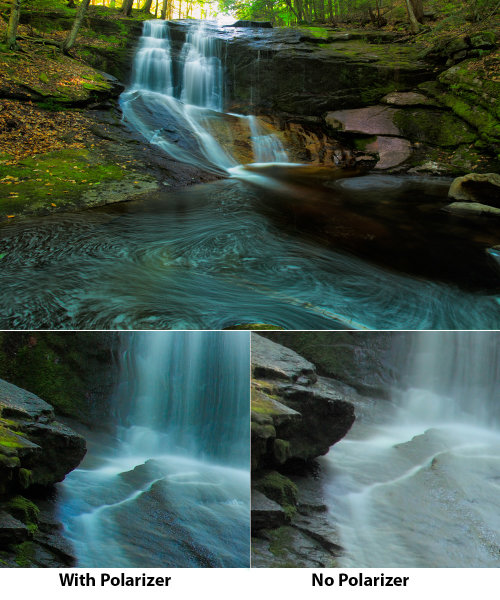
- Use a polarizing filter. Polarizers are famous for darkening blue skies on sunny days, but they are just as useful in other situations. In misty or hazy situations, polarizers can help cut through that haze.* Haze has the effect of softening an image, so using a polarizer to eliminate the haze enhances sharpness. So don�t hesitate to put the polarizer on your lens, even when darkening a blue sky isn�t the reason.
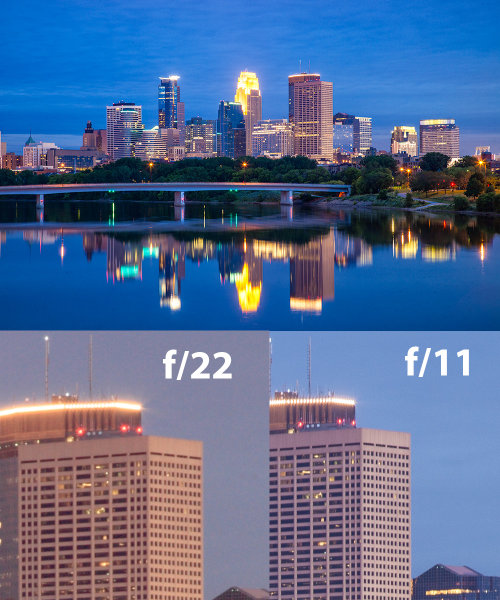
- Use the �sweet spot� of your lenses. Most lenses are at their sharpest when stopped down 2 or 3 stops from maximum aperture. However, even if for depth of field reasons it�s not possible to stop down that far, closing the aperture 1/3 to 2/3 of a stop will still increase sharpness. By the same token, when a lot of depth of field is required, shooting one or two stops open from minimum aperture will provide the best sharpness. This is because at minimum aperture, lenses begin to exhibit diffraction. Diffraction happens when light is forced through a small hole, and begins to disperse. At larger apertures, this light is a small percentage of the total light hitting the sensor. At smaller apertures, this diffracted light is a much greater percentage of the total light hitting the sensor. Diffracted light causes images to appear softer. By shooting at f/16, rather than say, f/22, you can minimize diffraction and thus get sharper images.
The above finished and edited image was shot at f/11. Beneath are two crops. The crop on the left shows the same scene, shot a few moments later at f/22. The crop on the right is from the same file as the completed image, shot at f/11, but unedited. In the shot at f/22, you can clearly see the effects of diffraction, as the windows on the building are just not as sharp as those shot at f/11.- Select the AF point you want to use, and put it where you want to focus. Many photographers I talk to like touse the center AF point and use the �Focus and Recompose� method of focusing to create their images. Unfortunately, while easier in many ways, this method can contribute to less sharp photos. This is especially apparent when shooting at wider apertures and depth of field is shallower. When you do this, the focal plane shifts, moving it away from where you originally focused. It�s not a big deal when shooting at smaller apertures, but when shooting near wide open, it will be noticable. A better technique is to choose the AF point nearest where you want the sharpest focus. This reduces focal plane shift, thus keeping the sharpest focus where you want it in your photo.
- When using zoom lenses, focus at the focal length you plan to shoot at. In the past, in the manual focus days, lenses were parfocal, meaning that you could zoom the lens and the focus would stay the same. Many of today�s lenses, however, are not parfocal. So changing the focal length by zooming causes focus drift, and the lens is no longer focused where it was before it was zoomed. The better bet is to zoom the lens where you want it for your composition, and then focus the lens.
There is obviously much more to getting sharper images, but these five basic tips are a good start to keeping your images sharp.
Source


 Reply With Quote


Social Networking Bookmarks